
The Profiles tab
This manages such operations as profile switching, creation, deleting, making current, exporting, importing and others. The current profile name will be seen at the top of the dialog. All existing profiles are listed below in the profiles list.
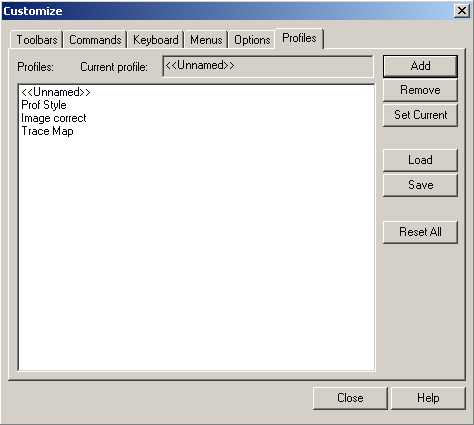
| The Add button | Shows the Add Profile dialog window to create a new profile. In the dialog enter a new profile name and specify settings to be read from the profile every time it is made current. Click the Ok button to add the new profile. See Profile creation and Profile import / export in the previous section for additional information. |
| The Remove button | Deletes a selected profile. |
| The Set Current button | Makes a selected profile current (applies all profile settings to the application). |
| The Load button | Export a profile from a WIP file. See Profile import / export in the previous section for additional information. |
| The Save button | Shows the Add Profile dialog window to import the current profile to a WIP file. See Profile import / export in the previous section for additional information. In the dialog type a name of the newly created profile for a WIP file. Specify settings which will be exported to a WIP file and click the OK button. Specify a name for the exported file and click the Save button in the dialog window. |
| The Reset All button | Deletes all profiles and sets the default one. Actually this operation removes all the custom profiles from the registry and restores the default one from the .CFG file. These changes will take effect after reloading the application. |
The Add Profile sub-dialog
This sub-dialog may be called from the Profiles tab or the Switch to Profile dialog.
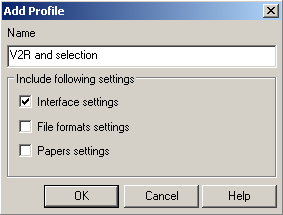
Specify here a new profile name and which settings you want to include into your new profile.
Interface settings – settings that are located in the Customize dialog and Preferences dialog (except for the Raster File formats and paper settings).
File Format settings – settings which are located in Preferences / Raster File Formats tree.
Paper settings – settings which are located in Preferences / Papers tree.
Rapid profiles switching
The Switch to Profile dialog is used for rapidly switching and creating profiles.
To start the dialog click the Switch Profile from the Tools menu
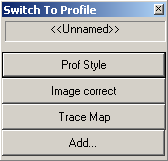
Click the button with a profile name to make it current.
Click Add button to create a new profile. In the Add Profile dialog enter a new profile name and specify settings to be read from profile every time it is made current. Click the Ok button to add the new profile.
Post your comment on this topic.