
Gamma Correction
This tool is used to enhance the overall quality of an image by changing its so-called “color profile” – i.e. it applies an “algorithm” to change the distribution of brightness.
Every image has its brightest point (a “white” point) and its darkest point (a “black” point). The points having intermediate values of colour intensity are usually distributed unevenly, forming a curve of an arbitrary shape. The Gamma value defines the slope of the curve halfway between the black and white. Using the Gamma Correction tool, the points that fall within in a specified range of brightness can be made either brighter or darker. The brightness of Red, Blue or Green colours can also be changed.
To change colour profile
Choose Gamma Correction from the Image menu.
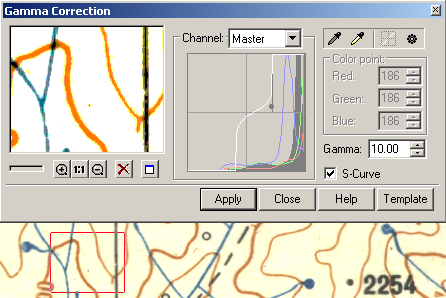
The Gamma Correction dialog is displayed. Do the following:
Specify white and black points using the relevant eyedropper tools;
Choose Master or specify a colour in the Channel list;
Create Gamma curve automatically or adjust it manually;
See the results in the preview window. Press Apply.
Specifying black and white points
Use the  buttons to pick the black or white point values directly from the image. Select an appropriate tool and draw an area on the screen.
The Color point section of the Gamma Correction dialog allows for precise adjustment of colour values. If any values are set different from (0,0,0) for a black point and/or (255,255,255) for a white point, then the points located outside this range will not be affected by the Gamma correction procedure.
The Auto Set button  calculates the black and white point values automatically for every colour channel. The histogram in the middle of the dialog window reflects colour brightness distribution. The curve for every channel can be changed separately.
Click  to reset the gamma curve.
Changing the gamma curve
There are three interrelated methods of changing the shape of the Master gamma curve and the curves for individual channels.
1. Select or clear the S-Curve checkbox. S-curve is a form of a gamma curve that is always symmetrical around the central point of a distribution range. This implies that when adding brightness to dark areas we automatically darken bright areas to the same extent creating a more balanced brightness for the human eye. If the S-Curve checkbox is off, then a gamma curve can be created by shifting the overall balance of brightness in the resulting image.
2. Enter a value in the Gamma box. This changes the curve slope.
3. Drag the Master curve or the curves for individual channels in the histogram window.
When Master is selected in the Channel list, all the curves are shown (at first you see them as a single white curve since the curves for colour channels overlay).
When placing the mouse pointer over the curve a bold point will be seen that can be dragged to change the shape of the curve. While keeping the mouse pointer over the curve, the real distribution of colour brightness on the image can be seen.
To change the shape of the curves for the Red, Blue or Green channels, select the corresponding colour name from the Channel list.
For some images the Master curve Red, Blue or Green components can also be split by pressing the Auto Set button  .
.
Post your comment on this topic.