
Blocks
A block is a collection of objects that can be associated together to form a single object named block definition. A block can be inserted in a drawing as many times as you need.
A block definition can contain other (nested) blocks. The only restriction on nested blocks is that you cannot insert blocks that reference themselves.
Existing blocks can be modified only by redefining it, i.e. by creating a new block under the name of an existing one. After modification, all instances of the modified block inserted in the document are automatically converted to the new block.
View and control blocks in the Blocks window (menu Tools). Modify block insertion properties in the Inspector dialog.
Exploding a block breaks it into its component objects.
To create a block
1. Select objects for the block.
2. From the Draw menu, choose Create Block or from the Main toolbar, click the  button.
3. To assign a specific name to a block, type the name in the Inspector window or
select an automatically generated name such as “Block_”.
4. Select the mode of block creation: Remove, Replace or Leave in the Inspector window. Set the other block properties if necessary.
5. Select the insertion base point.
When a block is created in Replace mode, objects that make a block are replaced by the block. In Remove mode objects that form a block are deleted from the document. In Leave mode all constituent objects are left intact.
To insert a block
1. From the Insert menu, choose Insert Block or from the Main toolbar, click the  button.
2. Select the name of the block in the dialog that appears. Then click on the location of the insertion point or to insert an instance of the last inserted block, simply click on the location of the insertion point.
To replace definition of a block
1. Select the objects for the block.
2. From the Draw menu, choose Create Block or from the Main toolbar, click the  button.
3. In the Inspector window select the name of the block that you want to modify.
4. Choose the Yes button in the confirmation dialog box.
5. Select the insertion base point.
All other instances of the block will change automatically.
To explode a block
1. Select a block.
2. From the Modify menu, choose Explode or click the  button from Modify toolbar.
Block attributes
Users can also set attributes to a block to create. A block attribute is a text included in the block, whose value can be re-defined for each block insertion.
To create an attribute, include a multiline text in the block. After being inserted in the block, the following set of symbols in the multiline text will be defined by the block as an attribute: , where attribute name represents the name of the block attribute displayed in Inspector while the block parameters are being edited.
For example, insert the following multiline text in the block displaying a workstation:
Employee:
Position:
Then set in the Inspector the values of the attributes for each block insertion: , and
On the screen something like this will appear:
Employee: Smith John
Position: designer
Block manager
The Blocks window is opened by pressing the button  on the Properties toolbar or by choosing Blocks from the Tools menu.
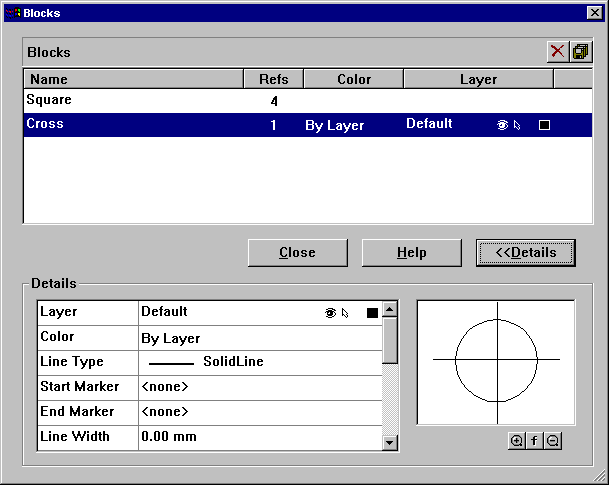
This dialog first appears in a reduced form. Clicking on Details opens the block properties list and Preview window.
The Refs field contains the number of block insertions in the document. The value 0 in Refs means that the block definition is stored, but the block has not been inserted in the document. To delete a definition, allocated for block storage, press the button  .
.
If the number of block insertions in the document is not equal to 1, then all the property fields are empty and you can only see the block image in Preview window.
The Name, Colour and Layer fields and also properties in the Details list are enabled when a block is inserted only once.
Post your comment on this topic.