
Images
With WiseImage raster images can be opened or inserted and combined with vector objects.
Raster object selection in WiseImage makes raster editing as easy as vector editing.
Using WiseImage, transformation of raster objects into vector objects is simple. Pick a raster object on the image, and then WiseImage automatically recognizes its shape and creates the approximating vector. There is an option to delete the original raster. Deleting an original raster object does not leave breaks and gaps in intersecting raster lines.
A raster image inserted into a drawing is either externally referenced ( linked images ) or embedded to WiseImage document. When inserting an image from an existing file, the WiseImage object raster image insertion is created which contains a path to the image file, scale, rotation angle, insertion point, and other properties. The reference or link to the raster image can be modified or deleted at any time. Raster images can also be stored inside a WiseImage document as embedded (note that it increases the size of the WiseImage document file).
Raster images, as other WiseImage objects, can be rotated, scaled, copied, moved, and cropped.
WiseImage supports almost every standard image file formats used in computer graphics, document management, mapping and geographic information systems (GIS). Images can be bitonal (monochrome), 8-bit greyscale, 8-bit colour, or 24-bit colour. In the case of bitonal images, the background pixels are treated as transparent.
Each image inserted in a WiseImage document has a border. Select an image by specifying a point on its border; if a point inside an image is specified, the image will not be selected. Images can also be selected using the Select Image dialog.
A raster image properties can be changed, including:
image layer, boundary colour;
image visibility on the screen, border visibility on the screen;
image transparency in percentage;
switching on/off background transparency of bitonal images;
image clipping;
read-only status;
scale, rotation angle, insertion point.
Multiple raster images can be inserted in the document.
Any existing image may be loaded and placed in the workspace at the selected location. Images can be edited, saved, and closed. New raster images can also be created in WiseImage.
To open a raster image
To open an image, choose Open from File menu and select an image from the list. WiseImage will open a new document that will contain only one object – an image. The loaded image will be inserted at point 0,0 with scale 1 and rotation angle 0. The image can be changed and saved. WiseImage saves images in their native format by default. If, during working, some other objects are added in the document, then it may not be possible to save all document contents in the image file. In this case, either save an image loosing some data, or save the document in .CWS file. Predefined raster or vector objects can be inserted into newly opened images. These objects are stored in file templates and their usage is controlled by settings in the Template Usage section of the Tools > Preferences dialog (see Tuning The Application). For example, if there is a document called BORDERS.CWS with a drawing frame and title block, this can be set as a template in the For New documents section, so that every new image automatically opens with a frame and title block.
To insert an image into a current WiseImage document
Choose From file from the Insert menu. After selecting an image in the dialog, it needs to be placed in the document workspace. When moving a dashed rectangle representing the image border to the appropriate position, click to finish the insertion.
When inserting, specify an insertion point and/or scale or rotation angle in the Inspector window.
An insertion point can be specified when initially inserting an object (the left bottom corner of the image). In this case the image is inserted with a zero rotation angle and at a scale of 1:1. For example, choosing A4 format with Portrait orientation, and millimetres as measurement units, an image of 297 mm in height and 210 mm in width will be inserted.
To change an image scale, specify a scale factor in the Inspector window.
The Angle field in the Inspector window allows the rotation angle of the inserted image to be entered.
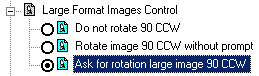
To load very wide monochrome raster images
WiseImage can open bitonal raster images not higher than 16 million pixels and not more widely than 64500 pixels.
There is, however, an ability to open very wide bitonal images. Those images will be inserted visually as is but with the Angle property equal to 90 degrees.
A wide bitonal image will be saved to a raster file rotated by 90 degrees.
Options for this feature can be set with the Large format images control item of the Preferences dialog.
To create a new raster image
1. Choose New Image from the Insert menu.
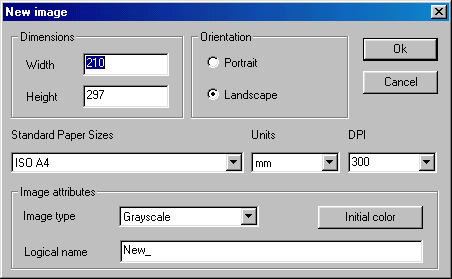
2. Enter the image size in Width and Height or from the Standard Paper Sizes list, select the image size.
This list only contains the sheet formats included in the Paper Formats list of the WiseImage Options dialog box. This list can either be added to or reduced. See (Tuning the application).
3. Select an orientation required for the specified sheet format in the Orientation box.
4. Select the required image resolution in DPI, and the measurement units that will be used when image scaling in Units.
5. Click OK.
Specify an insertion point, and/or scale or rotation angle in the Inspector.
An insertion point can be specified when initially inserting an object (the lower-left corner of the image). In this case the image is inserted with a zero rotation angle and at a scale of 1:1. For example, choosing A4 format with Portrait orientation, and millimetres as measurement units, an image of 297 mm in height and 210 mm in width will be inserted.
To change an image scale, switch to the Inspector and specify a scale factor.
The Angle box in the Inspector allows the rotation angle of the inserted image to be entered.
An image that only contains selected objects can be created. The procedure is described on (Creating new image from vector and raster selection). The newly created object will have embedded status. See the description of embedded images below in this section. A new image can also be inserted directly from a scanner (see on Inserting a scanned image into an existing document ).
To change image properties
Image properties can be changed with the Inspector window and in the Images dialog.
Post your comment on this topic.