
Fill Shape symbols
Custom shapes can be created to fill closed objects. In WiseImage you several predefined shapes can be used, replaced, and new shapes created and saved for future use. All shape definitions are located in the FILLSHAPES subfolder of the WiseImage program folder as *.SHF files. They are automatically loaded at the start of each WiseImage session.
To fill a closed area with shapes
1. Select a closed object – circle, closed polygon, rectangle, etc.
2. Open the Inspector window (  button).
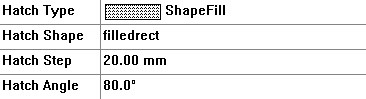
3. Select TRUE in Filled, then ShapeFill in Hatch Type and then select a Hatch Shape.
The selected object will be filled with shapes placed on the vertices of an invisible rectangular grid.
4. Specify Hatch Step and Hatch Angle to modify the size and orientation of this invisible rectangular grid.

The filling shape specification in the *  *Result
Inspector window
To create a fill shape symbol
1. Select one or several vector objects.
2. From the Tools menu select the Create Fill Shape command or press  button on the Draw toolbar.
3. The selected objects will appear in the Create Shape dialog box
4. Click  button to save the shape. The FILLSHAPES subfolder is used to save shape definitions; all shapes saved as *.SHF files of this folder are automatically loaded during a WiseImage session and their names appear in the Hatch Shape list.
Buttons in Create Shape dialog box
 Create a shape from Create a shape from a selection |
Places selected object from the document workspace to the Create Shape window |
 Load shape from file Load shape from file |
Opens *.SHF file and loads a shape to the Create Shape window |
| Save |
Saves a shape as a *.SHF file |
 Save As Save As |
Saves existing or changed shape in a new *. SHF file |
Zoom buttons in the window bottom allow the details to be seen. The Fit button (with letter “f”) scales a shape to fit the Create Shape window.
Post your comment on this topic.