
Managing Images
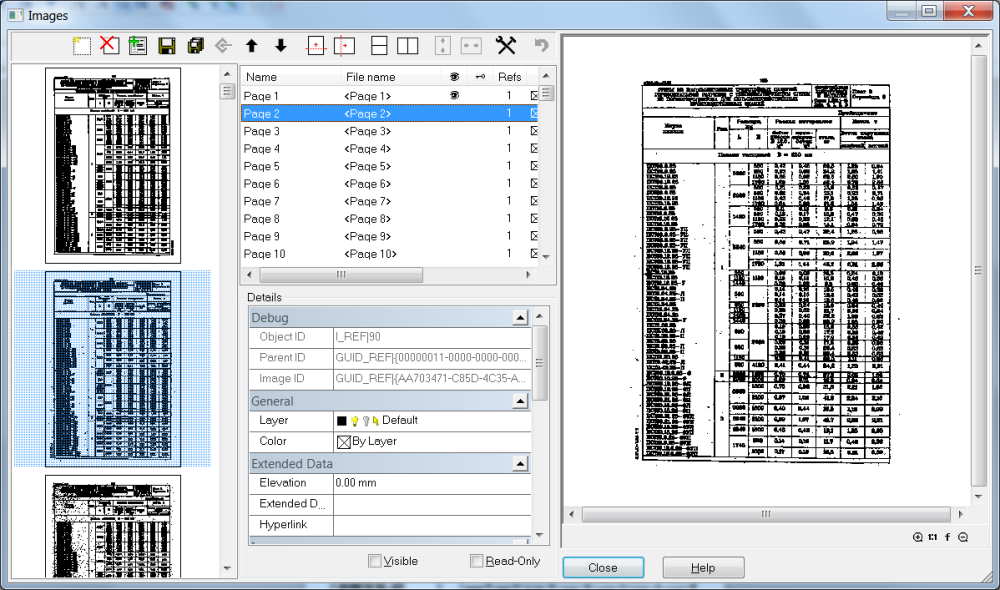
The Images dialog lists the names of all raster images loaded into the WiseImage document.
To open the Images dialog
Choose Images from the Tools menu or click  button on the Properties toolbar.
To change the properties of an image, select it from the list or from the preview window. Multiple selection is unabled.
Name
In this box type in the logical name of the image.
File Name
Displays the selected image’s filename.
Read-Only and Visible attributes
These attributes control the ability to change the images. They are represented by Visible and Locked (  and
and  icons) and two checkboxes in the Details section of the dialog. TRUE and FALSE values can also be set for these attributes in the Details list or in the Inspector window.
Visibility of images can also be toggled on/off with the Show/Hide Rasters command, see (Controlling the display of an object’s line width). This operation does not change the visibility attribute of images
References
Images are created or opened once but can be inserted (and displayed) many times. Reference shows the number of times the image has been inserted in the document. For example, if an image is selected, copied, and pasted, then the Reference field will contain 2.
If the image is not inserted anywhere in the document, then Reference will contain 0. It means that image data still exists in the document and is ready to be shown again; to purge it, you must press the Delete button 
Colour
Displays the colour of an image (for monochrome images). A colour can be chosen to distinguish between images in the Inspector window or Properties toolbar. The By layer option assigns the layer colour to images that belong to this particular layer; and By block assigns the colour of the block to an image that is part of the block.
Layer
the layer to which an image belongs can be seen and the image moved from one layer to another (actually the image does not “move”; but the Layer attribute of the image changes).
Details
This button opens the full list of image properties. For example, rotate an image by specifying a non-zero value in Angle or make it opaque by setting FALSE in Transparent Color (for monochrome images). the same properties list can be seen in the Inspector window for a selected image.
Preview
This is the standard WiseImage Preview window. It can display the entire image or zoom to an area. Buttons and options are described on page (Preview window).
Buttons
 |
New | Creates a new image. |
| |
Delete | Purges an image from the document. |
 |
Save | Saves an image. |
 |
Insert Page | Inserts an page from file |
 |
Save As | Saves an image to a new file. |
| |
Embed | Embeds the selected image. The image is not linked to the file and exists only in the document. See the description of embedded images below. |
 |
Up | Moves the selected image or page of multipage TIFF up. For multipage TIFF this is a way to rearrange pages before saving. |
 |
Down | Moves the selected image or page of multipage TIFF down. Moves selected image or page of multipage TIFF up. For multipage TIFF this is a way to rearrange pages before saving. |
 |
Cut by Horizontal | Cuts the selected page by specified horizontal line |
 |
Cut by Vertical | Cuts the selected page by specified vertical line |
 |
Cut Horizontaly | Cuts the selected page in half horizontaly |
 |
Cut Verticaly | Cuts the selected page in half verticaly |
 |
Combine pages | Combines two pages as top bottom page |
 |
Combine pages | Combines two pages as left right page |
 |
Run Script | Runs the specified script on the selected pages |
 |
Undo | Undo the last operation. Supports the one step only! |
Embedded vs. Linked images
There is a possibility to insert an image in document from a file, process and save it. During its work, WiseImage keeps image file name and allows to save raster image at any time with the the Save button from the Images dialog.
WiseImage can also process images, which are actually located in the document. Any linked image can be embedded in WiseImage document. To embed a linked image, select this one in the Images dialog and press Embed button  . The word appears in File Name.
Embedded images can be created by applying the WiseImage commands New Image, New Image from Selection (see description on Creating new image from vector and raster selection), New Image from Scanner. They are also generated by WiseImage procedures that create images such as binarization and colour separation.
To change embedded image to linked
1. Select an embedded image and press  button.
2. Select a filename and an image format in Save As dialog.
3. Press OK.
.
Post your comment on this topic.