
Exporting
It is possible to export an entire WiseImage document or selected objects to AutoCAD, MapInfo format, HPGL/2 formats, ESRI Shape-format as well as to select desired objects from a current document and export them to a new WiseImage document, and also export raster images to PDF, multipage TIF and multipage CIT files.
To export a WiseImage document or selected objects
1. Select desired WiseImage objects if you need to export particular objects.
2. From the File menu, choose Export or click the  button on the Miscellaneous toolbar. The Save/Export document File dialog appears.
3. Select a folder to save the file in and file format from the list of Save as type box.
4. The Options button offers the optional settings for the selected file format.
5. Type a new name in the File Name box or select it from the list.
6. Switch on the Selection Only checkbox to export selected objects only.
7. Click Save.
| Export formats | Exported objects |
| WiseImage (5.х – 7.х) (.cws) AutoCAD (.dwg, *.dxf, *.dwf) of version R14 (AutoCAD LT 97) and higher |
Vector objects and/or raster images |
| Adobe (*pdf) Multipage *.tif Multipage *.cit |
Raster images |
| AutoCAD (.dwg, *.dxf, ) of version R13 (AutoCAD LT95) and lower MapInfo (.mid) HPGL/2 (.plt, *hp, *hpg) ESRI (.shp) |
Vector objects |
Export to AutoCAD DWG/DXF format
Start the Export or Save As command, choose the AutoCAD DWG (.dwg) or AutoCAD DXF (.dxf) from the format list and click Options button.
Use the displayed dialog to select the desired properties.
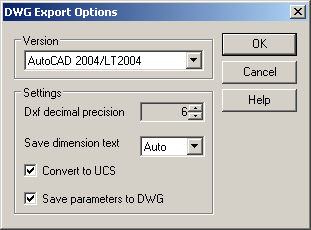
When exporting to DXF format specify the Dxf decimal precision parameter. It defines the maximal decimal precision for the exported document so it can be decreased to the appropriate value.
The Convert to UCS parameter is used when saving and exporting. If it is set to on when saving objects in DWG format, then the coordinates and sizes of objects specified with user’s measurement units (for example, centimetres) will be recalculated to the corresponding ones in the DWG file. This result is achieved through scaling objects and recalculating coordinates.
The method of dimension text conversion can be chosen in the Save dimension text combo-box. Unfortunately, there is no foolproof method to convert WiseImage dimension text to AutoCAD dimension text and vice versa, because the dimension text of one application has its specific properties and document concatenations, which is missing in another application.
Text – This method allows conversion of a WiseImage dimension text field (the text with its numeric part (%N)) to a plain (word-for-word) AutoCAD text, i.e. a text without a numeric part. Such text will not be changed by a dimensional transformation, but visually it will be identical to the source. This method may useful if DWG format uses as archive format for finished drawings.
Auto – This method allows conversion of a text in dimension text. But if there is no reasonable way to do this, then a text will be converted in the same way as in the first method (a plain word-for-word text).
For example, AutoCAD has no such UCS property as scale. So if a WiseImage document has UCS scale unequal to 1 and Convert to UCS checkbox is OFF, then there is no ability to convert dimension text as it is – the dimensions values of in the WiseImage document and in the AutoCAD document would be different.
Click OK.
Enter the file name in the Export dialog and click OK to execute exporting.
The UCS scale can be applied, or not, to geometrical object properties, such as text height and line width while exporting or saving to DWG/DXF. Use the Apply UCS scale to geometrical object properties checkbox in the DWG Export section of the Preferences dialog.
Export to MapInfo format
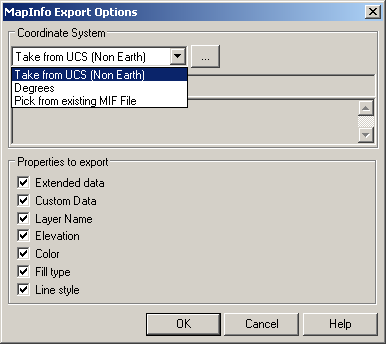
1. Start the Export command, choose the Mapinfo file (MID) from the format list and click Options button.
2. Use the displayed dialog to select desired coordinate system and properties. Click OK.
3. Enter the file name in the Export dialog and click OK to execute exporting.
Two files with MID and MIF extensions are created. When exported, some objects are broken to their constituent parts (see the table below). When exported raster images contained in a WiseImage document are ignored.
| WiseImage objects | Mapinfo objects |
| Line | Line |
| Point | Point |
| Arc | Arc |
| Circle | Circle |
| Polyline | Polyline |
| Rectangle | Frame/Region |
| Text | Text |
| Multiline text | Text |
| Raster image | Ignored |
To export object properties which are not native to WiseImage but are specific for Mapinfo do the following steps:
1. Add custom properties to the objects that are identical to Mapinfo object properties
2. Turn on the Custom data checkbox in the Mapinfo Export Options dialog
Export to ESRI Shape-format
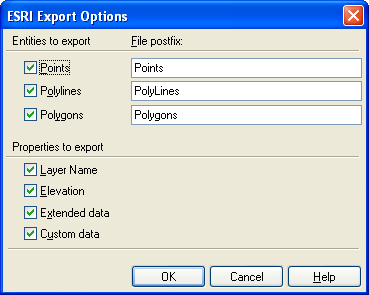
1. Start the Export command, choose the ESRI Shape file from the format list and click Options button.
2. Select the appropriate checkboxes (Layer, Height, Attributes) to export all attributes you need. The export settings should be saved between work sessions.
To export object properties which are not native for WiseImage, but are specific for ESRI Shape format do the following steps:
1. Add custom properties to the objects, which are identical to ESRI Shape format object properties
2. Turn on the Custom data checkbox in Export Options dialog
| WiseImage objects | ESRI Shape format objects |
| Point | Points |
| Line | Polylines |
| Rectangle | Polylines and Polygons |
| Arc | Polylines |
| Circle | Polygons |
| Ellipse | Polygons |
| Polyline | Polylines (and Polygons if closed) |
| Spline | Polylines |
| Multi-string text | Ignored |
| Hatch | Ignored |
When being exported, complex objects such as dimensions and blocks are exploded into simple objects; hatches and texts are ignored.
Post your comment on this topic.