
Objects Separation by Type and Size
This operation allows separating raster objects of various values into different raster layers. Hatch, text, linear objects and objects by size (isolated groups of adjacent points) can be separated from an original image.
During this operation the program searches for objects in a monochrome image and moves them to a new raster image. The resulting image has the same parameters (size, insertion point, resolution, and scale) as the original image; however it is placed on a user-specified layer. No image objects are lost since they are only moved to a separate raster layer.
This operation can be used:
• instead of speckle remover filter, to keep small-size objects which the program may remove as a ‘speckle’.
• to apply tools to the objects of a specified type (for example, editing texts and hatches).
If the objects are not to be removed from the original image, then erase the entire raster layer obtained. If any important objects are transferred to this layer, then select them and transfer them back to the original image, and then remove an unnecessary raster layer.
To separate objects
Select objects to separate. With no object selected, the operation will be applied to all visible images located on un-locked layers.
Choose command from the Image menu; alternatively press the appropriate button on the Image toolbar:
In the opened dialog set the parameters by which the objects should be separated.
The dialog and settings depend on a type of a selected object. The buttons in the dialog located next to the measurement fields 

 can be used to measure parameters from the image. For this, press an appropriate button and specify what is needed on the screen. A measured value will appear in the appropriate field.
To fill in the Output Layer field you need to make the same actions for all the dialogs:
Enter a name of the layer to place an image containing selected objects;
Set a colour for this layer – click on the colour sample located next to the field and select a colour from the dialog.
Observe the result in the preview window. When satisfied, press the Apply button.
Setting parameters in the object separation dialogs:
1 Separation by size
Set the minimum and maximum object size in the appropriate fields.
2 Separation Linear Objects
In the Max Width field specify the maximum width value for a raster line of the objects to separate.
In the Gap Jump field specify the maximum gap value to ignore in the raster lines.
3 Separate Text Areas
In the Max.width field specify the maximum width value for a raster text line.
In the Text Height field specify the maximum size of the upper case letters.
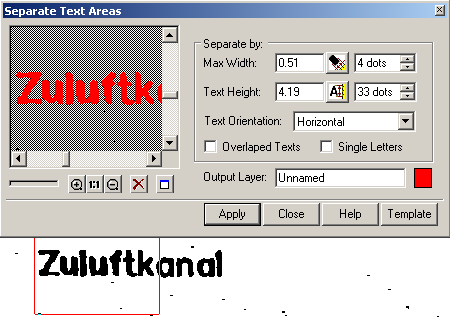
Select the Text Orientation – Horizontal, Horizontal and Vertical or Arbitrary Oriented from the combo-box. If needed, then select the ‘Overlapped Text’, and/or ‘Single Letters’ checkboxes to improve the text recognition quality.
4 Separate Hatches
In the Max Width field specify the maximum width value for a raster hatch line.
In the Gap Jump field specify the maximum gap value to ignore in the raster lines.
In the Hatch Angle field specify the hatch angle.
To save or delete a created raster image
A created raster image containing separated objects becomes embedded in the WiseImage document automatically; it gets the name of the layer set in the Output Layer field. To save this image to a separate file:
From the Tools menu choose Image; or press the button  ,on the Properties toolbar;
In the Image dialog select the created image, press the Save As button  ,set a file name and format.
To delete a raster image containing separated objects press the Delete button in the Image dialog 
To bring objects back to the original image .
Select objects to bring back to the initial image using one of the selection methods. If all the objects are to be brought back, then select the created raster image by its vector frame or use the Select Image dialog  .
.
Choose Merge (Rasterize) in the Modify menu.
Post your comment on this topic.