
Scanning
Scanning creates a new image and inserts it into the WiseImage document. WiseImage uses the WiseScan LE tool. WiseScan, an advanced module designed to work with large-format monochrome and colour scanners. With the practical scan control dialog that presents compactly all WiseScan LE settings the user can quickly and easily define settings and start scanning.
Working with Directly Supported Scanners
In the Direct Support Mode WiseScan LE performs scanning with the use of the built-in scanner functionality (dynamic threshold, background suppression, half-tone transfer, etc.), and are executed in real-time. WiseScan LE controls the scanner on the hardware level – this method is the most efficient when producing high quality images. Gamma curves editing and manipulation helps to scan images of poor quality with colour reproduction defects or change colour profile of these images. The user selects modes and parameters, and the scanner processor executes processing runtime and transfers the results to a workstation.
Direct support helps to improve the quality of scanning images and speeds up the scanning process. It is highly suitable for difficult sepias and blueprints and other kinds of similar drawings with background defects. Support for a linear and adapting palette and palette classification speeds up the process of scanning and preparing GIS maps and plans.
Working with TWAIN Scanners
WiseScan LE scan supports TWAIN API for working with TWAIN compatible scanners. In this mode WiseScan LE simply carries out fast image output and post processing; it has none of the advanced features as in the direct support mode.
Begin scanning with WiseScan LE
Select the Acquire in the File menu. If WiseScan LE is launched for the first time, then the Select Source dialog will appear.
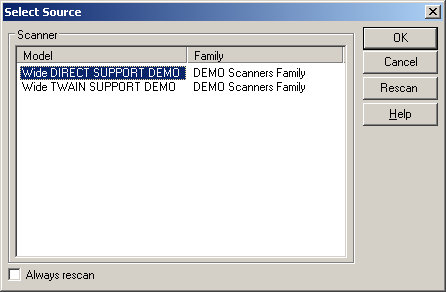
The user can choose a source of scanning in the Select Source dialog. The dialog opens with the Select Source command of the File menu.
Process scanning
WiseScan LE works in Scan to View mode. In this mode a scanned image is automatically loaded into the main program. It allows processing of an image right after it is scanned using the batch instruments of the main program.
This mode provides additional image processing.

If the Save To checkbox is selected then the location where the acquired image will be saved after processing must be given. The file mask must also be specified.
The Output folder list shows the current naming scheme for folders with the use of macros. The  button opens the standard Windows Browser for folder dialog in which the folder name can be combined with macros. This is available only when the Save To checkbox is switched on. Optionally an FTP address can be the destination folder.
In the Mask list the list of characters to be appended to the filename is specified. This is available only when the Output checkbox is switched on.
Refer to Ws_[Scanner Vendor] manual for information on scanning modes and WiseScan controls.
To exit from WiseScan LE
1. Press the Stop button to stop scanning.
2. Select the File > Acquire command or press the button in the host application’s File toolbar (when WiseScan LE is active the Acquire command in the File menu is checked and the button is pressed).
Post your comment on this topic.