
Polylines collecting
The Collect Polylines command is designed for assembling vector polylines obtained as a result of the trace or automatic vectorization. When checking the results it is best to use the raster image as a substrate.
Choose the Collect Polylines from the Correct menu to start this command
Click the first polyline.
While the cursor is moving, which polyline will be added to the current one, and the result, can be seen. Choose the next polyline by clicking on it. Click the next polyline. The program automatically pans to the end point of the resulting object.
Use right-button menu during command running:
| Back step | Cancels the latest step. |
| Cancel | Cancels the command and current polyline creation. |
| Continue | Continues the command. |
| End | Finishes current polyline collecting. |
| Close | Closes the current polyline. |
| Change Direction | Changes the current collecting direction. |
| Centralize View | Pans an image to show the last added polyline nodes at the screen centre. |
This command adds a new item into the Inspector window Auto Properties.
If the Auto Properties item is off (No), then the properties of the resulting polyline (such as its colour, thickness, markers) can be changed in the Inspector during the command execution. Otherwise the resulting polyline will inherit the current document properties.
Collect Polylines special modes
There are special modes for modifying the resulting object during the polyline assembling process:
Case 1: polyline 1 has a stray tail, and you need to attach it to polyline 2
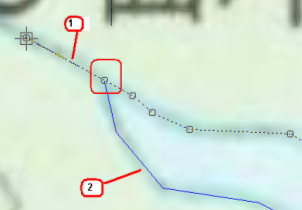 Press CTRL and click a point on the current polyline 1 in which it must be broken. Polyline assembling will continue from this point.

Case 2: polyline 2, which you want to append, has a stray head
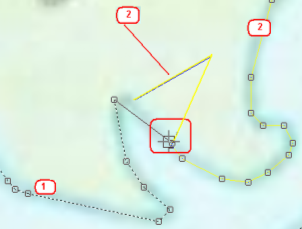 Press CTRL and specify a point on polyline 2 to which it must be attached. It will be broken at this point and added to polyline 1.
Case 3: to close a current polyline
 Press CTRL and click on one of the current polyline end points. The polyline will close and the command will be finished. The closed polylines are highlighted with round, instead of square, grips.
Case 4: to draw a segment of a polyline manually
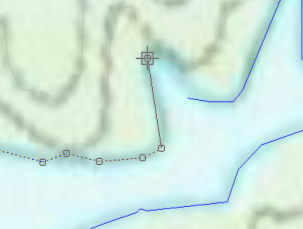 Press SHIFT and draw as many segments as necessary.
Case 5: to add some vertices to a current polyline
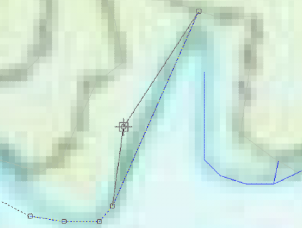 Press CTRL+SHIFT and add as many vertices as necessary
Post your comment on this topic.