Four-Point Correction
Four-point correction is a simple way to eliminate trapezoid, parallelogram or projective distortions in images (technical drawings mainly). This procedure is based on the assumption that an image frame and its contents are distorted in the same way. This procedure can be used to correct image geometry if its frame has a trapezium or parallelogram shape, rather than a rectangular.
This operation can be applied to several images at once. For example, correct a “pile” of images placed one over another.
To perform this procedure, specify the desired frame size – its height and width, and the appropriate current position of the frame corner dots on the image. After correction the image is transformed so that the frame corner dots are moved to the rectangular frame corners of the specified size.
To perform four-point correction
1. Select the images to correct by four-point correction. If no image is selected, then this command processes all visible images located on unlocked layers.
2. Run the operation using one of the following methods:
Choose 4-point correction from the Image menu or click the 
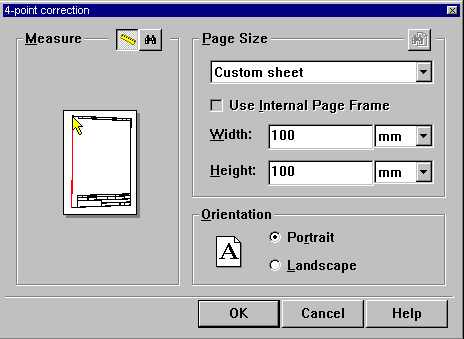
The following dialog box is displayed:

3. Press the 
4. To specify the frame corners manually, press the 
5. Type the desired frame size in Width and Height.
6. Select the orientation – Portrait or Landscape.
7. Click OK.
The 
The Paper size contains standard paper formats.
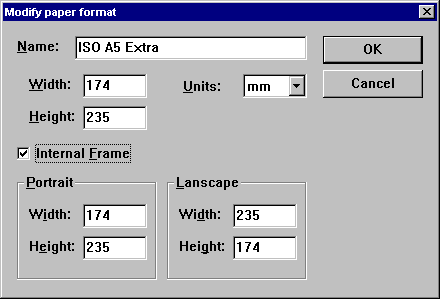
Use Internal Page Frame lets the user use the corresponding drawing frame size that is stored for a particular format (internal page frame size is set in Tools > Preferences > Papers > Modify dialog, in Internal Frame section).

If Internal Frame is not checked in this dialog, then the Use Internal Page Frame checkbox in the 4-point correction dialog is unavailable.
If Internal Frame is checked, then settings in Portrait and Landscape sections are automatically reflected in the Width and Heights fields of 4-point correction dialog.


Post your comment on this topic.