
Layers
A WiseImage document consists of layers on which WiseImage objects can be organized. By placing objects on layers, their visibility can be controlled and changes easily made. The properties of every WiseImage object include the layer the object belongs to. The objects created can have either the default properties of a WiseImage document or assume some of them from the layer they belong to.
Thus, by specifying By layer in the corresponding boxes of the WiseImage document properties, the properties of created objects can inherit the properties of the layer they belong to. Otherwise, the properties of created objects will inherit the properties of a WiseImage document.
Layers can be created, named, and properties assigned to them. Each layer has a set of properties, such as its unique name, display colour, line type, line weight, and more. A layer can be visible or hidden, locked or unlocked, selectable or unselectable. One of the document layers is a current layer on which all drawn objects are placed by default.
When beginning a new document, it always contains a layer named Default with the properties that coincide with those of the WiseImage document. An unlimited number of layers can be created. A new layer inherits the properties of the layer that was selected when created. A newly created layer is always visible, unlocked, and selectable. The program assigns the name New Layer (N) to it, where N is ordinal number.
Layers can be created and deleted; the information on their properties viewed and changed using the Layers dialog.
To open the Layers Manager dialog
Choose Layers from the Tools menu or click  button on the Properties toolbar.
The Layers dialog appears:
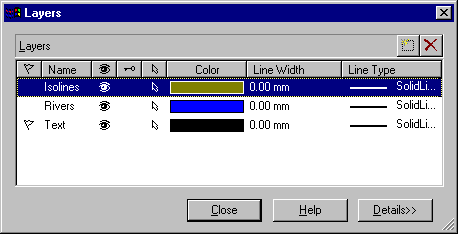
The Layers window can be expanded by pressing the Details button to display the full list of the layer properties to be inherited by the objects created on it and inserted in it.
Creating a new Layer
To create a new layer, press the  button on the Layers dialog.
A new layer with the name New Layer (N) appears in the list. This layer is always visible, unlocked, and selectable.
If the newly created layer is to inherit the properties of another layer present in Layers, then select that layer before creating the new layer.
Deleting Layers
A layer which is not current and does not contain any objects can be deleted at any time during the working session. To delete a layer which contains objects delete these objects first.
Select an empty layer to delete from the Layers dialog list and press the  button.
Renaming Layers
A layer may be renamed to better define how it is used in the document. A layer can be renamed at any time during the working session.
*To rename a layer: *
Select a layer to rename from the Layers dialog box list, and then:
Click its active name and enter the new name to Name or select Name in the full Layers window and enter the new name.
Making a Layer active
An object is always created on the active (current) layer. This object can assume properties from the layer it belongs to, if By layer value is set in the corresponding boxes of WiseImage document properties. The active layer should be always visible
To make a layer current:
Select a layer to make it current in the Layers dialog, and then:
Click the Active icon  or turn on the Active checkbox in the full Layers window.
Controlling Layer visibility
WiseImage does not display or plot the objects that are placed in an invisible layer. The current layer is always visible. An invisible layer cannot be current.
To turn a layer on or off:
Select a layer to turn it on or off in the Layers dialog, and then:
Turn on or off the visibility icon  or turn the Visible checkbox on or off in the full Layers window.
To toggle visibility off on all the layers, click on the  button on top of the layers list. This toggles the visibility of all layers, except the active one.
Locking or unlocking layers to edit
Locking layers is useful when editing objects associated with particular layers whilst viewing but not editing objects on other layers. Objects on a locked layer cannot be edited. However, the objects are still visible and can be selected and their properties viewed. A locked layer can be made current, and objects can be created and inserted in it.
Commands that do not change the properties of objects located on a locked layer can also used (for example, select required vectors and convert them to a raster image which is inserted in another unlocked layer). Object snaps can applied to objects on locked layers. The visibility of locked layers can also be turned off as well as their properties changed.
To lock or unlock layers:
Select a layer to lock or unlock, and then:
Click the Lock icon  on or off or turn the Locked checkbox on or off in the full Layers window.
To toggle locking for all layers click on the  button on top of the layers list.
Controlling object selection
A layer can be made selectable or unselectable.
For example, if there are multiple layers and objects that belong to certain layers need to be selected, the other layers must be made unselectable (and/or invisible).
To make a layer selectable (unselectable):
Select a layer to make it selectable or unselectable:
Turn on or off the Selectable icon  or turn on or off the Selectable checkbox in the full Layers window.
To toggle selectability for all layers click on the  button on top of the layers list.
Controlling Layer printability
WiseImage displays but does not or plot the objects that are placed in an unplottable layer.
To turn layer printability on or off:
Select a layer in the Layers dialog, and then:
Turn on or off the visibility icon  or turn the Printable checkbox on or off in the full Layers window.
To toggle visibility off on all the layers, click on the  button on top of the layers list.
Specifying Colours
A colour can be assigned to layers so that all objects belonging to these layers are displayed in this colour. The colour of objects is set by choosing a colour from the list in the Properties toolbar or in the Inspector. If the By Layer attribute is set, then the colour of objects is determined by the layer on which the object resides.
The colour of objects that are components of blocks is set on block creation and controlled with the By Block attribute.
To change the colour of layer, first select the layer, then choose a colour from the drop-down list or from the Choose Colour dialog.
Specifying other layer properties
In Layers it is possible to specify all properties that can be inherited by the objects created on it. Ensure the By layer value is set in the corresponding boxes of the WiseImage object properties.
Select a layer to change the properties. Define the required values for this layer. To set the layer properties, except Line Width and Line Type, expand the Layers window by pressing the Details button.
For more information on controlling of object properties see “Inspector” on (Inspector).
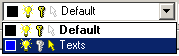
Access on the fly
Layers properties can be easily managed in corresponding sections of the Inspector window and Preperties toolbar.
Post your comment on this topic.