
Conversion to RGB, greyscale and 8-bit indexed
Every image in WiseImage can be converted to greyscale, RGB (24 bits per colour) and 8-bit indexed image.
Conversion operations can be applied to several images of an appropriate type at once. So, if several images are inserted in the current drawing and they are available (visible, allocated on unlocked layers), select a group of raster images before running this operation.
By converting monochrome images to greyscale or RGB it is possible to apply colour filters to the image (Blur, Unsharp and Median).
Conversation colour image to 8-bit indexed is the tool facilitating colour management.
This operation is not applicable for images with a clipping boundary.
To convert an image to RGB
Select images to be processed. Choose Convert to RGB from the Image menu.
To convert an image to Greyscale
Select images to be processed. Choose Convert to Greyscale from the Image menu.
Converting to 8-bit indexed
This command supplies the user with a way of to reducing the file size of an image by changing its colour depth (number of bits that store colour information) from 24 bits per pixel to 8 bits per pixel. This is also a way to tune colours precisely.
When applying this command to an RGB colour image, the number of colours used reduces to 256 (or less). Further reduce this number by deleting selected colour or colours or by merging several colours into one.
Selected colours can also be replaced and add them to the palette.
Note that colour filtering (blurring, Unsharp mask and medianning) can be applied only to colour images. Hence it would be a good idea to apply colour filters to a RGB image before converting it to an image of indexed colours.
Choosing the Image > Convert to > Convert to 8-bit indexed produces a dialog box with tools for manipulating with palette and the individual colours and preview window.
To convert an image to 8-bit
Select the images to be processed. Choose Convert to 8-bit indexed from the Image menu.
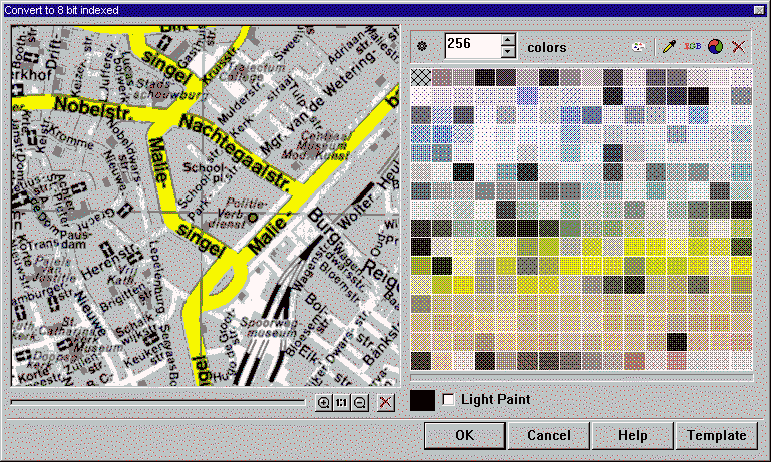
The buttons and controls in Convert to 8-bit indexed dialog window
| Colour samples table | Contains the samples of colours of the current palette, i.e. the palette that will be applied by pressing OK. | |
 |
Colour counter | This control is used to show the number of colours in the current palette. This number can be enlarged or reduced. |
 |
Set auto palette button | Pressing this button forces WiseImage to automatically create the palette. WISEIMAGE determines the set of colours that most truly represents the image and places them into the colour samples table. Their number is reflected it the colour counter spinbox. |
 |
Reset palette button | Restores the native palette of the image. |
 |
Preview and Light paint | The Preview window is supplied with its usual set of buttons described on . The Light paint is the additional tool consisting of colour selector and Light paint checkbox. The Light paint tool lets the user see where the pixels of selected colour reside in the Preview window. To preview pixels of selected colour Preview window 1. Select colour sample (samples). 2. Click on the coloured box near the Light paint checkbox and choose an appropriate colour in the colour selection dialog. Press OK. 3. Check the Light paint box. For better previewing select a colour for light painting contrasting to those in the colour samples table. 4. Pan the image in the preview window and see the pixels and areas of colour selected on step 3. |
 |
Eyedropper | This tool is used to obtain a colour by clicking on the pixel in the Preview window or in document window. |
 |
RGB button | Opens a dialog of colour selection, lets new colour to be chosen and changes the colour selected in the colour samples table with the new one. The image is repainted with the new palette. |
 |
Merger button | Merges the colours selected in the colour samples table to the mean colour. The image is repainted with the new palette. |
 |
Delete button | Deletes the colours selected in the colour samples table from the palette. The image is repainted with the new palette. |
| Template | This button provides options to save and load colour and palette information to and from template files. See more information on template files on Dialog Templates |
To create a palette automatically
Press Set auto palette button  .
- or –
Reduce the number of colours in the Colour counter spinbox.
The palette will be automatically recalculated and the image repainted to reflect changes.
.
- or –
Reduce the number of colours in the Colour counter spinbox.
The palette will be automatically recalculated and the image repainted to reflect changes.
To reset a palette
Press Reset palette button  .
The palette will be recalculated to best fit the number of colours set in the Colour counter spinbox.
.
The palette will be recalculated to best fit the number of colours set in the Colour counter spinbox.
To delete colour from a palette
1. Select colour(s) to be deleted in the colour samples table by clicking on them with SHIFT pressed.
2. Press delete button  . Watch as the image is repainted.
The number of colours can also be reduced by setting the number of colours in Colour counter spinbox and pressing the
. Watch as the image is repainted.
The number of colours can also be reduced by setting the number of colours in Colour counter spinbox and pressing the  button.
To add colour to a palette or replace existing one
1. Click on the colour sample to be replaced or on a box in the colour samples table that is not occupied.
2. Press RGB button  and choose a new colour in the colour selection dialog.
- or –
Pick the colour from the image with the eyedropper tool
and choose a new colour in the colour selection dialog.
- or –
Pick the colour from the image with the eyedropper tool  .
.
To merge colours
1. Select colours to be merged in the colour samples table by clicking on them with SHIFT pressed.
2. Press merge colours button  . Watch as the image is repainted.
Post your comment on this topic.