
Correction by Histogram
This operation is applied for precise adjustment of the image brightness, hue, and contrast. The tool of correction by histogram requires the specification of two threshold brightness levels – the brightest and darkest pixels, and image gamma that defines the position of the middle brightness value relative to the current threshold values.
The gamma defines a ratio of the brightness range length between the average and the brightest value to the length of brightness range between the dark threshold and the average value. As a result, the pixels with a brightness value below the dark threshold gain zero brightness value; the pixels with a brightness value above the brightest one gain maximum brightness value (255), and the brightness values of the pixels between the darkest and the middle values as well as between the middle and the brightest ones are relocated evenly in conformance with their range lengths determined by image gamma.
An increase in gamma value causes the range for brightness value in the dark range to reduce, and therefore it increases the contrast, at the same time reducing the contrast in the light hue area, and vice versa.
The command enables users to redistribute both image pixels average brightness and brightness by separate colour pixel components (Red, Green, and Blue). It enables image pixel colour to be corrected, for example, to turn a pink background to pure white.
To correct an image by histogram
1. Select an image to be processed.
2. Click the  button on the Image toolbar or choose Equalize from the Image menu.
The following dialog box appears:
button on the Image toolbar or choose Equalize from the Image menu.
The following dialog box appears:
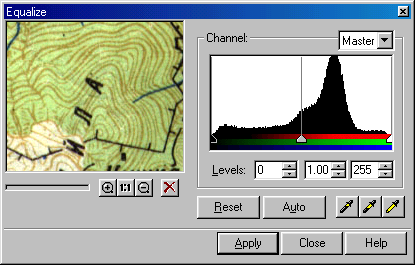
This dialog box represents the image histogram, displaying the averaged number of pixels, corresponding to each brightness value. The left part of histogram corresponds to low brightness value, and the right one corresponds to high brightness value (the lightest tones). The sliders in the bottom part of histogram indicate threshold values: the left black one is for the darkest value, the grey middle one is for the middle value, and the right white one is for the brightest pixel. The Levels box provides the numerical expression of current threshold values. One of four histograms can be selected: Master displays summary pixel brightness distribution, Red, Green, and Blue display distribution of the corresponding pixels colour components. Use the Master histogram slides to proportionally modify the threshold value for all components at once. The histogram sliders Red, Green, and Blue modify brightness threshold values separately for the corresponding colour component.
The eyedroppers are used to select threshold values and gamma for an image. When selecting a colour sample with the  (or
(or  ) eyedropper, it defines the threshold value for the darkest (or the lightest) for all components equal to the corresponding components values of the selected colour. When selecting a colour sample with the
  eyedropper, it defines the position of the middle tone, and hence defines the image gamma.
3. Select a histogram corresponding to the colour component to be corrected.
4. Specify the brightness value for the darkest and the brightest pixels, and for the image gamma. Use Levels or eyedroppers. Use histogram slides for precise adjustment.
The preview window displays part of the image. Use the preview management tools to adjust optimal correction parameters.
Use the Auto button to automatically specify the light and dark threshold values so that the brightness values of each colour component not found in the image are cut off. Automatic correction tries to increase image contrast as much as possible, slightly modifying brightness values.
Suppose we want to make the background tone of a map image pure white. To do so, select a background sample with the white eyedropper. The white triangle in the Master histogram moves to the position corresponding to the selected colour brightness. All the pixels with a brightness value above the defined one become white. Then suppose we want to turn outlines, which are not pure black after scanning, black. Select a colour outline sample with the black eyedropper, all pixels with a brightness value below the defined one become black.
The brightness value of the remaining pixels will be proportionally redistributed within the new tone range. As a result, the image contrast increases. Move the grey slider (modifying gamma value) to redistribute the contrast between the light and dark image parts.
5. Click Apply to run the operation.
This operation can be applied several times, consistently modifying an image pixel brightness distribution.
Post your comment on this topic.