
Color Separation
A real map or colour diagram is usually made up of a small number of colours. However, as a result of scanning a paper original we can get a colour raster image having tens or even hundreds of thousand of colours.
Two similar procedures are described in this section that make possible to separate colour image dots in non-overlapping sets, i.e. categories. These procedures are used to extract the colours the original image was created with. The objects of the same type are usually marked with the same colour; therefore we are able to separate the necessary image objects.
Each category is based on a set of basic colours. A set of basic colours that belong to all categories defines the separation of the original image dots in non-overlapping basic subsets.
To distribute colours into subsets WiseImage performs the following procedure. The colour difference between each dot of a colour image and all specified basic colours is calculated. This dot is put in a subset of basic colour that has the minimum colour difference from the colour of this dot in the RGB area. Thus, all the original image dots are split to basic subsets, related to the specified basic colours.
The dots belonging to basic subsets, which correspond to colours of one category, form this category.
For example, consider an image with a blue line passing across yellow and white background. Actually, this line consists of blue and green dots. Thus to classify the image dots correctly, we need to define three categories: the first one with yellow basic colour where all dots of yellow background will be put, the second one with white basic colour where all dots of white background will be put, and the third one with green and blue basic colours where all dots of blue line will be put.
On layering, the program places the dots of each category in a separate monochrome image. The original colour image is not changed.
As a result of this procedure the program assigns the same colour to the dots belonging to the same category. It causes colour reduction in the original image.
Separation to several monochrome layers
The first step to specify separation parameters is to define a set of object categories in the original image. For example, a category set may be the following: background, isolines, roads, railways, buildings, vegetation, rivers, etc. Up to 255 categories can be specified. Each category has two properties: name and symbolic colour.
A symbolic colour is used to display dots, belonging to a certain category, in the preview window during the adjusting of separation parameters. It is also assigned to the monochrome layer to which the dots of this category are transferred. A symbolic colour does not need to correlate with the colour of extracted objects.
To enable the program to extract the points, belonging to different categories, at least one basic colour needs to be specified for each category. As described above, the dots with the colour close to the category basic colours are placed into the appropriate category. The number and set of basic colours are defined manually when tuning the procedure.
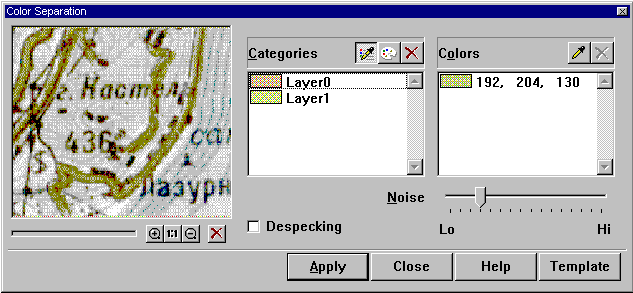
Image layering is performed with the Colour Separation dialog box.
Running color separation
When performing the separation procedure, the program creates a separate monochrome image for each category and places the object points, belonging to this category on this image. The new layers are created in the document, on which new raster images are placed. The layer’s names are the same as the categories names. Images colours are defined according to the symbolic colours of appropriate categories. New monochrome images get the names N, where N is an integer.
Several color raster images can be separated into layers at once. If no images are selected, then the command will be applied to all images (that are visible and located on unlocked layers). If several images are selected, then the command will be applied to those that are visible and located on unlocked layers.
Layering can be applied to images with clipping boundary. Using this feature, the layered area in any image can be restricted by specifying its clipping boundary.
For information on clipping boundary refer to Cropping.
To tune and run Colour Separation
1. Select images to process.
2. Click the  button on the Image toolbar or choose Colour Separation from the Image menu.
 Create a category set, using the Create Category button as described below in this section.
 To modify a category definition or delete a category created by mistake use the Delete or Modify buttons in Categories.

Use the preview tools of the color separation dialog box to view the results of modifying parameters. Note that an image review at a scale of 1:1 provides the most reliable results.
3. If not satisfied with separation results, then try one of these methods:
Modify the category basic colours or add new basic ones, using the buttons of Colours. Note that a sufficient number of basic colours, describing each category should be specified. Colour samples both in the middle and closer to the object boundary should be selected.
- or –
Use the Noise Reduction slider and Despeckle option to redistribute dots by categories.
Deleting and modifying definition and a set of category basic colours are irreversible operations. So, if the option of returning to the current dialog box parameters adjustment is wanted, save the current adjustment to a template using the Template button before starting to change parameters or category set. The adjustment saved in the template can be restored later.
4. When satisfied with the quality of separation, click the Apply button.
Tuning color separation
Specify category attributes and basic colours in Categories and Colors of the Color Separation dialog box. Categories contain a list of specified categories, and buttons that allow creating, modifying, and deleting category definitions. Colors displays a list of basic colors of a category selected from the Categories list box and buttons that allow the basic colors of a selected category to be added or deleted.
To add a new category
1. Click – Create category button in Categories.
2. Specify with the eyedropper tool the object in the image, the dots of which should fall in the created category.
The Layer Name and Color dialog box will be displayed.
A category’s symbolic color and name can be specified. By default the box specifies the color corresponding to the specified pixel color and the category name “LayerN”, where N is an automatically generated number.
To modify these default parameters, enter the category name to Name and select a color from the palette.
3. Click OK.
In the Categories list a new category appears, and in the Colors list the colour pointed to in the pixel image is shown.
If a mistake is made when specifying a category, then delete its definition or modify its symbolic color and name.
To delete a category definition
1. Select a category from the list of Categories.
2. Click Delete.
To modify a category symbolic colour and name
 1. Select a category from the Categories list.
2. Click the Edit Category button on Categories.
The Layer Name and Color dialog box will be displayed.
3. Enter a new category name in Name and/or select a symbolic color from the palette.
4. Click OK.
Note that the category set of basic colors is not changed when its definition is modified.
To add a category basic color
1. Select the required category from the Categories list.
The current set of the selected category basic colours will appear in Colors.
 2. Click the button with eyedropper on Colors and specify a point on the image.
The indicated point colour will be added to Colors.
If a mistake is made when selecting the basic color, then delete it. The mistake in color selection is detected by examining the separation results that are shown in the preview window.
To delete a category basic colour
1. Select the required category from the list of Categories.
2. Select a required basic colour from the list of Colors.
 3. Click Delete in Colors.
To adjust separation sensitivity to small objects
Use the Noise Reduction slider and Despeckle option.
Setting Despeckle on eliminates the influence of noise and small objects on the colour analyzing procedures.
The Noise Reduction slider allows the redistribution of pixels by categories by modifying the sensitivity of separation to small objects. This parameter modifies the degree of colour averaging when calculating pixel colour. If the averaging value is high, then small-sized droplets of unwanted colours (speckles) in large image objects will be classified as pixels of the categories to which relatively large objects belong. Due to high averaging value, the categories, containing small objects are distorted because the object edge dots are classified as objects of other categories. If averaging value is low, then the opposite effect is observed – the quality of small objects increases, the quantity of noise rises.
By default the slider is set to an average value. If categories containing large filled areas are the most important, then reduce the value of this parameter (move to Low) to reduce raster speckles and holes in these category objects.
If to get monochrome layers containing of small or thin objects, such as texts, characters, level lines or grids, then increase the value of this parameter, to prevent the small object shapes from being thinned and distorted by noise reduction. Of course, this increases the noise level on all layers.
Post your comment on this topic.